How to create Horizontal Menubar with CSS?

Creating a Horizontal Menubar is not so difficult but requires your attention towards each small part of the menubar.

Creating horizontal menubar is not so difficult as it seems.

If you want to learn how to create a stunning horizontal menubar then give it is try.

You can test this coding in our latest online editor 2015.

<html>
<head>
<style type="text/css">
* 
{
   margin: 0; padding: 0;
}

body 
{
   font-family: 'Lucida Grande';
   font-size: 10px;
   background: #eeeeee;
}

.navigation 
{
   margin: 200px 20px;
   background: #fff;
   overflow: hidden;
   width: 760px;

   box-shadow: 0 2px 10px 2px rgba(0, 0, 0, 0.5);
}

.navigation li 
{
   width: 120px; border-left: 5px solid #666;
   float: left;
   //cursor: pointer;
   list-style-type: none;
   padding: 10px 50px 10px 15px;

   -webkit-transition: all 0.3s ease-in;
   -moz-transition: all 0.3s ease-in;
   -o-transition: all 0.3s ease-in;
}

.navigation li h2 
{
   font-family: georgia;
   font-weight: normal;
   font-style: italic;
   font-size: 12px;
   margin-bottom: 5px;
   line-height: 16px;
}

.navigation li p
{
   font-size: 11px;
   color: #999;
 
   -webkit-transition: all 0.1s ease-in;
   -moz-transition: all 0.1s ease-in;
   -o-transition: all 0.1s ease-in;
}
.navigation li:hover 
{
   background: #333;
   border-left: 5px solid #000;
}
.navigation li:hover h2 
{
   font-weight: bold;
   color: #fff;
}
.navigation li:hover p 
{
   color: #ccc;
   padding-left: 5px;
}
</style>
</head>
<body>
<ul class="navigation">
<li>
   <h2>Home</h2>
   <p>Learn CSSBasicTips</p>
</li>
<li>
   <h2>LearningZone</h2>
   <p>CSS/HTML/Webpage</p>
</li>
<li>
   <h2>About</h2>
   <p>Who we are?</p>
</li>
<li>
   <h2>Contact us</h2>
   <p>For more Coding</p>
</li>
</ul>
</body>
</html>

Output for Horizontal Menubar:-
If you have any doubt or facing any difficulty in getting output, do let us know.

How to create Social Icons with CSS?

How to create social media icons with the help of CSS coding.

There are several third party tools or websites which are offering social media icons with a simple click.

Do you think that why they are offering you free service?

I hope you don't bother about this. But, I have few reason behind these free offerings.

Why we should create our social icons?

As per my observation, these below are top reasons that we should not use third party social icons on our websites/blogs.

And we should try to create our own social icons.
  1. Slowdown Host website
  2. Automatically gives Backlink to their website
  3. Add dofollow link for their websites (A thought)

However, I too, use these free services on my blogs but most of the time I use self created social media icons on my website.

So in this post, I am going to discus an easy way to create social media icons.

And all you can do with the help of little knowledge of CSS coding.

Don't worry, if you don't know about CSS, I will explain to you. Learning CSS is very easy and interesting too.


Create Social Media Icons

<html>
<head>
<style type="text/css">
#youtube 
{
  background-image: url(youtube.jpg);
  background-position: 50% 50%;
  background-repeat: no-repeat;
background-origin: border-box;

  display: inline-block; 
  width: 100px; 
  height: 100px;
  border-width: 50px;
  border-color: rgba(0,0,0,0);

  border-radius: 100%;
  -moz-border-radius: 100%;
  -webkit-border-radius: 100%;
 
  -webkit-box-sizing: border-box;
  -moz-box-sizing: border-box;
  box-sizing: border-box;

  -webkit-transition: 2s ease;
  -moz-transition: 2s ease;
  -ms-transition: 2s ease;
  -o-transition: 2s ease;
  transition: 2s ease;
}

#youtube:hover 

{
  border-width: 0;
  border-color: rgba(0, 0, 0, 0.5);
}
#facebook 
{
  background-image: url(facebook.jpg);
  background-position: 50% 50%;
  background-repeat: no-repeat;
  background-origin: border-box;

  display: inline-block; 
  width: 100px; 
  height: 100px;
  border-width: 50px;
  border-color: rgba(0,0,0,0);

  border-radius: 100%;
  -moz-border-radius: 100%;
  -webkit-border-radius: 100%;

  -webkit-box-sizing: border-box;
  -moz-box-sizing: border-box;
  box-sizing: border-box;

  -webkit-transition: 2s ease;
  -moz-transition: 2s ease;
  -ms-transition: 2s ease;
  -o-transition: 2s ease;
  transition: 2s ease;
}

#facebook:hover 

{
  border-width: 0;
  border-color: rgba(0, 0, 0, 0.5);
}
#twitter 
{
background-image: url(twitter.jpg);
  background-position: 50% 50%;
  background-repeat: no-repeat;
  background-origin: border-box;

  display: inline-block; 
  width: 100px; 
  height: 100px;
  border-width: 50px;
  border-color: rgba(0,0,0,0);

  border-radius: 100%;
  -moz-border-radius: 100%;
  -webkit-border-radius: 100%;

  -webkit-box-sizing: border-box;
  -moz-box-sizing: border-box;
  box-sizing: border-box;

  -webkit-transition: 2s ease;
  -moz-transition: 2s ease;
  -ms-transition: 2s ease;
  -o-transition: 2s ease;
  transition: 2s ease;
}
#twitter:hover 
{
border-width: 0;
border-color: rgba(0, 0, 0, 0.5);
}
#pinterest 
{
  background-image: url(pinterest.jpg);
  background-position: 50% 50%;
  background-repeat: no-repeat;
  background-origin: border-box;

  display: inline-block; 
  width: 100px; 
  height: 100px;
  border-width: 50px;
  border-color: rgba(0,0,0,0);

  border-radius: 100%;
   -moz-border-radius: 100%;
  -webkit-border-radius: 100%;

  -webkit-box-sizing: border-box;
  -moz-box-sizing: border-box;
  box-sizing: border-box;
 
  -webkit-transition: 2s ease;
  -moz-transition: 2s ease;
  -ms-transition: 2s ease;
  -o-transition: 2s ease;
  transition: 2s ease;
}
#pinterest:hover 
{
  border-width: 0;
  border-color: rgba(0, 0, 0, 0.5);
}
.icon_one
{
  border-style: inset;
}
.icon_two
{
  border-style: outset;
}
.icon_three
{
  border-style: groove;
}
.icon_four
{
  border-style: ridge;
}
</style>
</head>
<body>
<div href="#" class="icon_one" id="youtube"></div>
<div href="#" class="icon_two" id="facebook"> </div>
<div href="#" class="icon_three" id="twitter"></div>
<div href="#" class="icon_four" id="pinterest"></div>
</body>
</html>


Copy and paste above CSS coding in our latest Online Editor for 2015 to check output live.


Points to Remember

Please change the source code of each image where you have saved or copied your images. Otherwise it will show a blank page of screen.

If you find any difficulty in creating these fancy social media icons, do let me know, I will help you out.

How to create Round Buttons with CSS?

How to create round buttons in CSS? This is very easy and CSSBasicTips has proven it to be easy in this post.


Create Round Buttons

There are thousands of examples for creating stunning menubar for your website or blog.

But as per my observation, still there is not any simple way of creating these menubar buttons.

If you stuck over there on any website or you really want to create horizontal or vertical menubar for your blog/website, then this post is meant for you.

Coding for creating Round Buttons with CSS

<html>
<head>
    <style type="text/css">
    .pretty_round-button 
    {
        width:80px;
        height:80px;
        line-height:80px;
        border: 5px solid #ffffff;
        border-radius: 50%;
        color:#ffffff;
        text-align:center;
        text-decoration:none;
        background: #ff2354;
        box-shadow: 0 0 5px black;
        font-size:20px;
        font-weight:bold;
display:inline-block;
    }
    .pretty_round-button:hover 
    {
        background-color: #efefef;
color:#ff2354;
    }
    </style>
</head>
<body>
    <a href="" class="pretty_round-button">
Home
    </a>
    <a href="" class="pretty_round-button">
About
    </a>
    <a href="" class="pretty_round-button">
Contact
    </a>
</body>
</html>

Output of above cod is as shown below:-


Home About Contact

Hover your mouse pointer and see the hover effect of the buttons. Creating horizontal menu buttons with css is as simple as 123.

How to create Vertical Menubar easily?

This is very simple and you have to just remove one word from the above coding of creating horizontal menubar.

Just remove "Inline" from the coding "Display" and you code will look like:-

display:block;

If you have any problem in creating horizontal or vertical menubar in CSS, do not hesitate, just comment in the below section and we will give instant help.

You can also check this coding for live output with the help of our Online Editor of 2015.

How to create CSS Shapes Easily with CSSBasicTips?

How to create CSS Shapes easily? If you want to create shapes with css (stylesheet) then you must know CSSBasicTips.


What is CSS Shapes?

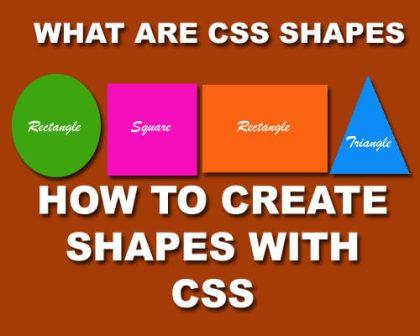
If you want to create shapes like square, rectangle, circle or oval with the help of CSS then CSSBasicTips blog is the best place to learn and implement your CSS skills.

You can also create responsive shapes with the help of style sheet (CSS). Initially it was possible only with the images but now you can create every type of shape with the help of CSS coding.

How to create Square with CSS?

First of all I will share the best way to create a square with the help of CSS (stylesheet).
  1. Copy the stylesheet coding between the <head> </head> tags.
  2. Copy the Div tag coding in the body section.
  3. Save your file and then check in browser.


<style type="text/css">
.square
{
    width: 300px;
    height: 300px;
    background-color: #FF2354;
}

span
{
    text-align: center;
    color: white
}

</style>
<div class="square">
    <span>This is a square box with size 300 x 300 pixel with text as centered</span>
</div>

Output (300 x300) Pixel Square

How to create square shape with CSS coding

How to create Rectangle with CSS?

To create a rectangle with CSS coding, just follow the instructions give below:- 


<style type="text/css">
.rectangle
{
    width: 400px;
    height: 200px;
    background-color: #FF2354;
}

span
{
    text-align: center;
    color: white
}

</style>
<div class="rectangle">
    <span>This is a rectangle box with size 400px width and 200px height with text as centered</span>
</div>

Output (400 x200) Pixel Rectangle

How to create a rectangle with CSS coding

How to create Circle with CSS?

To create a circle with CSS coding, just follow the instructions give below. This is as simple as making a square or rectangle. 


<style type="text/css">
.circle
{
    width: 400px;
    height: 400px;
    background-color: #FF2354;

    border-radius:50%;
}

</style>
<div class="circle"></div>

Output (400 x400) Pixel Circle

How to create a circle with CSS Coding

How to create Triangles with CSS?

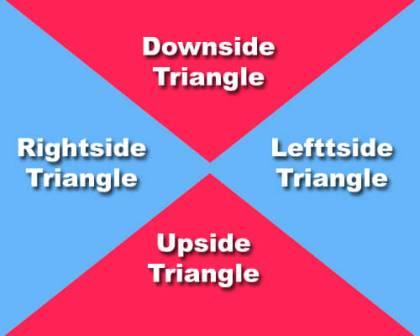
There are four main triangles in the box as shown in below image.

How to create four triangles of a box?
Now, I am going to create each side of the triangle with step by step coding. You just copy and paste the coding in the online editor of this blog to check the live output.

Creating Upside Triangle

<html>
<head>
<style type="text/css">
.triangle-up
{
    width: 25%;
    height: 0;
    padding-left:25%;
    padding-bottom: 25%;
    overflow: hidden;
}
.triangle-up:after
{
    content: "";
    display: block;
    width: 0;
    height: 0;
    margin-left:-500px;
    border-left: 500px solid transparent;
    border-right: 500px solid transparent;
    border-bottom: 500px solid #FF2354;
}
</style>
</head>
<body>
<div class="triangle-up">
  
</div>
</body>
</html>

Creating Downside Triangle

<html>
<head>

<style type="text/css">
.downside_triangle
{
    width: 25%;
    height: 0;
    padding-left:25%;
    padding-top: 25%;
    overflow: hidden;
}
.downside_triangle:after
{
    content: "";
    display: block;
    width: 0;
    height: 0;
    margin-left:-500px;
    margin-top:-500px;
   
    border-left: 500px solid transparent;
    border-right: 500px solid transparent;
    border-top: 500px solid #FF2354;
}
</style>


</head>
<body>
<div class="
downside_triangle"></div>
</body>
</html>

Creating Leftside Triangle

<html>
<head>
<style type="text/css">
.leftside_triangle
{
    width: 25%;
    height: 0;
    padding-top: 25%;
    padding-bottom: 25%;
    overflow: hidden;
}
.leftside_triangle:after
{
    content: "";
    display: block;
    width: 0;
    height: 0;
    margin-top:-500px;
   
    border-top: 500px solid transparent;
    border-bottom: 500px solid transparent;
    border-right: 500px solid #
65B5F9;
}
</style>
</head>
<body>
<div class="leftside_triangle"></div>
</body>
</html>

Creating Rightside Triangle

<html>
<head>
<style type="text/css">
.rightside_triangle {
    width: 0;
    height: 0;
    padding-top: 25%;
    padding-bottom: 25%;
    padding-left: 25%;
    overflow: hidden;
}
.rightside_triangle:after {
    content: "";
    display: block;
    width: 0;
    height: 0;
    margin-top:-500px;
    margin-left: -500px;
   
    border-top: 500px solid transparent;
    border-bottom: 500px solid transparent;
    border-left: 500px solid #65B5F9;
}
</style>
</head>
<body>
<div class="rightside_triangle"></div>
</body>
</html>

You can check all the coding in the online editor of this blog. This is the latest Online Editor of 2015.

Chapter 5 - What are Margins in CSS?

What are margins in CSS and how to set a margin with css coding?

Do you really want to learn CSS?
Learn CSS is easy if you know the right path of the information provider about style sheet tutorial.

But with the technological evolution or breakthrough in blogging, it is not possible for everyone to search the absolute information on the net.

However +Google is continuously making lots of efforts to provide the best search result but the the search result is not as per the requirement of the searcher yet.

It will take a time to produce the 100% relevant search result about the topic.

So, we decided to create a blog with the in-depth information about learning CSS or style sheet.

Today's topic is CSS Margins.

CSS Margins are outer space between the two or more. In other words, a css margin it the space all around an element.

Margins are of 4 sides/types and it is a Clock wise direction in coding:-
  1. Margin-Top
  2. Margin-Right
  3. Margin-Bottom
  4. Margin-Left
By default are side has margin existed but with your CSS coding you can either remove or extend margin of 4 the sides.

The margin property can be set for the top, left, right and bottom of an element. (See below example)


 Syntax of 4 sided margin:-

 margin-top:Value;
 margin-right:Value;
 margin-bottom:Value;
 margin-left:Value;

/*NOTE:- A margin value could be in Pixel, Percentage or auto etc.*/ 

You can also declare a margin value in a single row as it is shown in below example:-

 For setting all 4 sided margin use TRBL  format. Example:-

 margin:T R B L; (Top, Right, Bottom, Left)
 margin: 10px 20px 30px 40px;


/*NOTE:- A margin value should read clock wise.*/ 

 If values of all sided margin is same then use the following syntax:-

 margin:10px; /*4 sides margin*/
 margin:-10px; /*negative margin of 4 sides*/
 margin:10px 20px; /*top, right margin*/
 margin:10px 20px 30px; /*top,right, bottom*/

/*This will set 10px margin for all 4 sides*/
/*You can also set a negative margin value*/
/*You can also set margin of two sides*/
/*You can also set margin of three sides*/

You can read 4 sided margin as TRBL (This term is first ever used by CSSBasicTips).

Chapter 4 - What are CSS IDs?

CSS IDs are similar to css classes but starts with a hash (#) tag instead of dot (.).

CSS IDs are similar to CSS classes but starts with a hash (#) tag instead of dot (.). The basic functionality is same as class. You can either use a Class or an ID to format your website.

I use IDs that will be needed only once. However, you can use as may times as you want. There is not such any restriction for using multiple times.

For example, if I have to design a fixed header of my page, then I will use ID instead of Class because every page has only one header.

 #header
 {
   width:100%;
   height:60px;
   background-color:#ff2354;
   position:fixed;
   left:0;
   right:0;
   top:0;
 }

This is a very simple example of creating header with css ID.

If you have any query regarding CSS header, you can drop a comment below.

Chapter 3 - What are CSS Classes?

Every selector in CSS is a class

Every selector in CSS is a class but you can create your classes as per your requirements in style sheet coding.

So we can say that there are two types of CSS classes:-
  1. Pre-defined classes of CSS
  2. User defined classes of CSS

Pre-Defined Class

The class selector allows you to style items within the same HTML element differently. Similar to what I mentioned in the introduction about inline styles. Except with classes the style can be overwritten by changing out stylesheets. You can use the same class selector again and again within an HTML file.

CSS Coding for Pre-Defined CSS Class
 h1
 {
   font-size:extra-large;
   background-color:yellow;
 }

HTML Coding
 <h1>H1 Tag with yellow background</h1>

Output
H1 Tag with yellow Background


User Defined Class

In user defined classes of css, you can use any name of your choice for your class.

CSS Coding for User-Defined CSS Class
 .mycssclass
 {
   font-size:extra-large;
   color:red;
   background-color:yellow;
 }

HTML Coding
 <h1 class="mycssclass">H1 Tag with User Defined Class in CSS</h1>

Output
H1 Tag with User Defined Class in CSS


Please note that the user defined class selector begins with the (.) period but predefined class selector begins with the predefined HTML Tag. This is the basic difference between.

I hope you understand the basics of Predefined and User Defined Classes in CSS.

Now you can share your thoughts in below comment box, if you like this post.